 |
| About Pigeons Loft Construction Part 1 |
Step 1 - Cut 2 pieces of 3 ft. blocks and another 2 pieces of 2'8" blocks. Start by making a 3 ft x 3 ft frame for the flooring. The example below uses 2"x4" blocks. Adjust accordingly the middle blocks depending on the thickness of your blocks in order to make a perfect 3'x3' square frame. Use 4" nails or screws or whichever you like.
 |
| About Pigeons Loft Building - Step 1 Build The Flooring |
Step 2 - After completing the floor frame, this is the best time to attach the green chicken rabbit wire mesh netting, also cut in 3'x3'. This wire mesh netting is commonly used in building chicken coops.
 |
| About Pigeons Loft Building - Step 2 Attach Green Chicken Rabbit Wire Mesh Netting |
Step 3. Next is to make the 4 support as stands and corner posts. Start by cutting 2 pcs. of 5 ft. and another 2 pcs. of 4 1/2 ft. (4'6") blocks. From the top of each blocks, cut at an angle of about 10 degrees. See below for details.
 |
| About Pigeons Loft Building - Step 3 Stand Corner Posts |
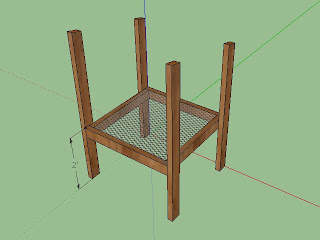
Step 4. Now, attach the stands to the flooring. Place the top of the flooring 2 ft. above the ground.
 |
| About Pigeons Loft Building - Step 4 Attach Stand To The Flooring |
Step 5. Then, for the front and rear upper support. Cut another 2 pcs. of 3 ft. blocks.
 |
| About Pigeons Loft Building - Step 5 Front And Rear Upper Support |
Step 6. Finally, for the left and right roof support. Cut 2 pcs. of 3 1/2 ft. (3'6") blocks. Attach it to the top on both sides.
 |
| About Pigeons Loft Building - Step 6 Left And Right Roof Support |
More information about pigeons racing soon...
Here is another tutorials about pigeons loft construction for starters.
And here contains about pigeons introductory loft designs for new fanciers.


